
We’ve had some exciting developments over the past few weeks. With the launch of our new website we have incorporated our blog. Don’t miss out on, follow us now!
Sorry for the inconvenience. We promise to stay put for awhile.
We’ve had some exciting developments over the past few weeks. With the launch of our new website we have incorporated our blog. Don’t miss out on, follow us now!
Sorry for the inconvenience. We promise to stay put for awhile.

By Linda Kay Harrison
When the days become a little shorter, and the nights a little longer, hardy Chrysanthemums take notice and begin their magnificent fall display of color. Chrysanthemums are one of the most popular perennials in the world, because of their fall blooming habit. When many other perennials are done for the season, the hardy Mum is just getting started. A pot of bright colored ‘mums’ is sure to help ease the painful farewell to summer.

Hardy mums come in a wide variety of flower colors, including white, yellow, gold, bronze, red, burgundy, pink, and lavender. Mums grow to about 2 or 3 feet high, depending on the cultivar and growing conditions. They are easy to grow and are long lasting as cut flowers.

Chrysanthemums work great in pots, but can also go right into the ground. They need well drained soil, and plenty of sunlight. They look great planted in masses, but don’t over crowd them, they need good circulation to avoid disease. To keep your mums a tight and busy plant, it’s a good idea to cut them back to about 8 to 10 inches after they are done blooming, then when the new spring growth is about 4 to 6 inches, pinch or cut back the center of the plant to encourage side shoots to fill in. Pinching just an inch or two every 3 or 4 weeks is enough. Then stop pinching by early summer so that flower buds can set. Don’t forget a good fertilize for your mums. We recommend Dr. Earth Bud and Bloom once a month from early spring to about July or early August for the best fall display.

Check out the beautiful selection of Chrysanthemums at any of our Dennis 7 Dees locations!

By Stacie Palmer of Dennis’ 7 Dees
September through November is THE time to plant bulbs for a succession of color next spring. Ideally, you’ll get your bulbs in the ground before it becomes sopping wet, and in time for root set prior to winter arriving. Why do we plant bulbs now? Spring-blooming flowers that come from bulbs need a period of cooling in order to flower; alas, NOW!
When selecting flower bulbs, choose as many as you have the space and energy to plant! When it comes to bulbs, more (versus less) is the key to big color and presence in spring. Inspect each bulb for a solid, healthy appearance, free of mold. Ideally you will get them planted as soon as possible after you make your purchase. Because life happens, plan to store your bulbs in a cool, dark place until you have the opportunity to dig.
Prior to planting, your soil will need to be enriched/amended . . .don’t skip this step! Work compost into the first 12-18 inches of soil—this is the amending part. You’ll also need on hand fish bone meal and/or Dr. Earth Bulb formula. Plan for about 2 cups bone meal for every 10 square feet of bed space. If using Dr. Earth Bulb formula, follow package directions. (In the spring a water soluble fertilizer solution may be used just when shoots emerge, then no more fertilizing).
The general rule of thumb when planting bulbs is to plant them two to three times deeper than the bulb is tall, with the pointed end UP. Regarding method of planting, you can either use a bulb digger or prepare large areas in which bulbs will be placed together. If some bulbs need to be planted deeper than others, no problem! Simply create mounds of soil within the larger hole, so that the more shallow bulbs are raised up to their needed soil depth. Another method is to simply toss your bulbs in the air, and plant them where they land. Not only is that fun, it also results in a more naturalistic look.
Equally important when planting bulbs is to provide them with nutrients, specifically a good source of phosphorous. For proper root and shoot development bulbs need phosphorous. Most commonly used is bone meal. This component is mixed into the soil just below where the bulb is placed. An alternate to bone meal is Dr. Earth Bulb formula (see above).
Whatever method you choose, once bulbs are placed at the appropriate depth, fill in the hole with soil, then water just enough to support root growth. A word of caution: over-watering newly planted bulbs puts them at risk of rotting long before they have the opportunity to bloom. This is also why you must take the time to amend your soil with compost: improve drainage.
The final step is to apply 2”-3” of mulch over the newly planted bed. Not only will the mulch help maintain optimal moisture level within the soil, it also minimizes fluctuation in soil temperature. Exception (there’s usually one, right?!): small, early blooming bulbs (such as Galanthus/snowdrops)—either apply a thin layer of mulch, or skip it entirely.

Go ahead, plan now to take advantage of bare spots in your beds that will be under trees and shrubs once they’ve lost their leaves. That’s prime real estate for bulb planting! Can’t wait until spring to see the blooms? Plant autumn flowering crocus (Crocus sativus ‘Saffron’) NOW! These sweet little lilac purple flowers each produce 3 fancy red stigmas, which is the source of saffron. Plant a couple dozen of them and harvest enough saffron to use in a few delicious meals.
Careful planning will result in bodacious blooms from January to June! Better yet, nearly all of the bulbs we commonly grow in our area are deer resistant! Round up your compost, shovel or bulb digger, bone meal, and fresh spring blooming bulbs. . .it’s planting time!

by Linda Kay Harrison
At the garden centers, we are often asked, “Is fall REALLY a good time to plant?”
The answer is… “Actually… yes!”
In the Pacific Northwest almost anytime is a good time to plant; but there really ARE some very good reasons to do it in the fall.
When new plants are installed in the spring or summer they have to go through the stressful heat of the summer with a small root system. They are often expected to bloom and sometimes even produce fruit under these stressful conditions. That can take a lot out of a young plant.
By filling your beds in the fall, your plants miss out on most of that stress. With the days being shorter, photosynthesis slows and stops, so plants aren’t actively growing. They go dormant and often don’t even know they’ve been moved. Even though the air is cooler, the ground is still warm, so the roots keep growing for weeks or even months without having to produce nutrition for growth or blooming. By the time your plants ‘wake up’ in the spring, their roots are strong and pretty well established in their new home.
You’ll also want to plant with plenty of Black Forest compost to break up that nasty clay soil, and give the roots something to work with over the winter.

One more great reason to plant in the fall… BARGAINS! Even though the selection may be smaller, the sales and specials are fantastic! You can save a lot of dollars, and that makes a lot of ‘cents’.
So when you tuck those plants into their beds for the winter, you can feel confident knowing that you saved a bundle, and your new plants will ‘wake up’ happy and ready to grow in spring.

By John Curtis – Landscape designer at Dennis’ 7 Dees
Have you ever thought about how to modernize a tired looking front yard? The same one you have been walking past for so many years and wondering what could be done to freshen it up. Here is an example of a front yard renovation project that gives a new look to an older style home.
The first goal was to create an updated look to the front entry. Another was to improve the handicap access of the front walkway. Because the entire front yard lawn sloped towards the house there was also a seasonal drainage issue that needed to be addressed. Water would accumulate around the front of the garage and entry during periods of heavy rain.

The design plan called for removal of the dated brick planter and entry walkway. The brick planter was replaced with a simple soil mound and large boulders. The brick walkway was replaced with a modern concrete paver pathway which was built up on both sides as it approached the front porch. This eliminated the steps and created a smooth surface and transition to the front porch that is easy to negotiate.

To solve the drainage issue, a decorative ‘dry creek bed’ was constructed with perforated drain pipe underneath to intercept any seasonal water build up and carry it away from the front of the garage and entry.
The owner had previously taken out some large trees and opened up planting areas that had been mostly shady in the past. Now these areas had a sunny, southwest, exposure and needed new plantings to fit the change in sunlight conditions The plantings were designed with a mix of evergreens, seasonal perennials and ornamental grasses to give a long lasting display of colors and interest throughout the spring and summer.

By implementing these landscape improvements, the entire look of this 1950’s ranch style home was successfully updated and the handicap access and drainage issues were effectively resolved.

SAVE THE DATE: Saturday, September 15th @ Lake Oswego & Sunday, September 16th @ SE Powell There’s no better way to end summer than with a beautiful harvest of fresh, juicy, colorful tomatoes. Each September our Lake Oswego garden center host an annual FREE home-grown Tomato Tasting Festival to celebrate this wonderful summer fruit and for the community to enjoy the delicious varieties available in the Northwest. We partner with our growers and a few employees pitch in to provide 50+ unique sizes, shapes, colors & flavors. For this first year we will be expanding this event to our SE Powell location.
Mark your calendar for Saturday, September 15th 10am-4pm at Lake Oswego & Sunday, September 16th 10am-4pm at our SE Powell garden center.
 Tomato guru, Nicole Forbes, cooks up yummy salsas & tomato recipes for all attendees to enjoy and to inspire those with too many tomatoes to handle. For the first year ever we will not only be tasting all the wonderful fruit but will have a few select varieties for sale as well.
Attendees will have a chance to vote for their favorite variety and plan their crops for next year. Stay tuned for this years winners!
Interested in entering our Salsa contests? Call Nicole Forbes at 503.777.1421 for details!


By Stacie Palmer – Planscaper at Dennis’ 7 Dees

Snow Queen
Let us introduce you to an autumn superstar: oakleaf hydrangea. You may be under the assumption that all hydrangeas are alike; myth debunked!
Native to the North American southeast, oakleaf hydrangea thrives in partial sun and rich, porous soil that has good drainage. Although oakleaf hydrangea is more tolerant of drier soil than mophead and lacecap hydrangeas, it is a plant that prefers regular water—definitely while establishing in the garden. Note: it does not tolerate ‘wet feet,’ so ensure that you’ve properly amended soil for optimal drainage. Fast growing, this rounded deciduous shrub introduces delectable texture, color, and presence.
From its deeply-lobed, large deep green leaves, to its elongated creamy-white flower panicles, gorgeous fall color, and cinnamon-color bark, this extraordinary shrub offers literally 12 months of interest. Better yet, there’s a variety for both large and small gardens!

fall color!
Spring arrives and we revel in oakleaf hydrangea’s amply-sized foliage. Late summer the flowers arrive! As summer progresses, the flower panicles transition from white to rosy/pinkish-mauve, and persist on the shrub well into fall–if you can resist cutting them for a bouquet! Summer winds down, the nights become cool, and plants prepare for slumber. It is at this time the foliage magically transforms into a feast for the eyes, rich with color. Green leaves evolve into an absolutely stunning crimson with purple and/or bronze tones. Enjoy the show, for winter is not far behind. Once oakleaf hydrangea drops its leaves, exfoliating cinnamon-colored bark is revealed. The plant’s unique texture holds us over until spring arrives and the cycle begins anew.

Pee Wee fall color
Common varieties of Hydrangea quercifolia are ‘Snow Queen,’ which produces stacks of single florets, and grows to an average of 4’-6’ tall and wide. Looking for something smaller? ‘Pee Wee’ matures at a mere 3’-4’ tall and wide and has all the same unique traits as its larger cousin. Either variety makes a wonderful specimen/focal point, massed grouping, or foundation plant within a bed.

Pee Wee
Should you need to prune your oakleaf hydrangea, do so after it has flowered to avoid cutting off next year’s flower buds. Pruning of this plant is not required, yet some people do so to create what is generally considered a ‘tidier’ look. Keep in mind that flowers can persist on the plant well into early winter, adding to its seasonal interest. Flowers left on the plant over the winter can easily be snapped off the branches in early spring (done just below the origin of the flower, taking caution to not disturb the new growth about to happen). Carefully remove dead branches at any time.
Looking to bring the beauty indoors? Just as other species of hydrangeas, the flowers of the oakleaf make a wonderful addition to a fresh and/or dried arrangement.

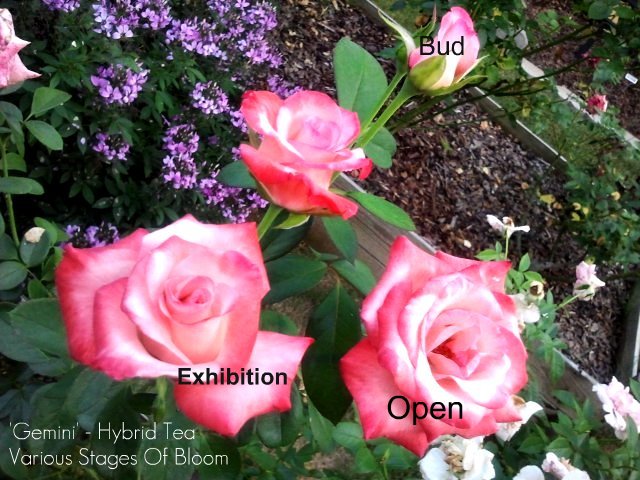
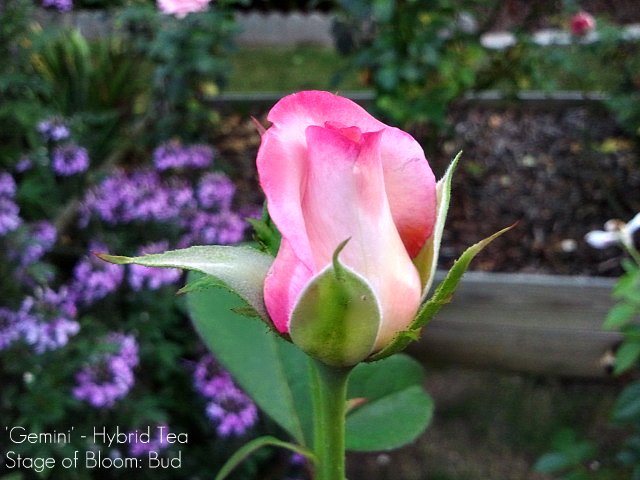
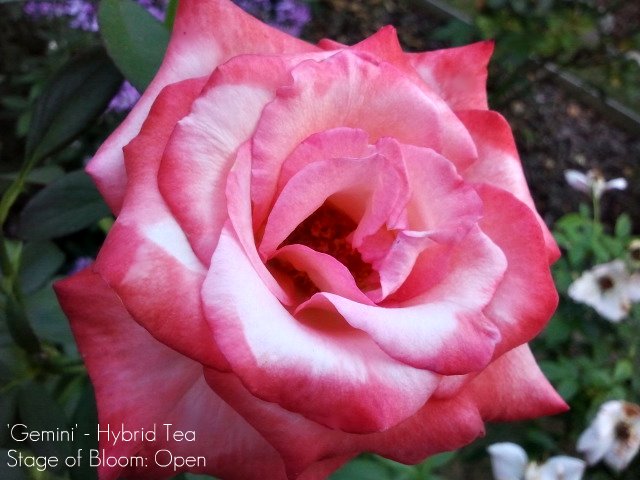
I often receive tweets on the #RoseChat Twitter stream regarding the stages of bloom for roses. I was out in the garden yesterday and came across a spray of blooms and it struck me that we have all stages of blooms represented here. I hope the photos below will demonstrate the three basic stages of bloom for roses. The one not marked, I would call “unfurling”.. Is that a word??? (yes, thanks Mr. Webster)

THIS WEEKEND ON ROSE CHAT RADIO:
We’ll be chatting with Kristen Smith, Plant Expert at STAR Roses & Plants. There new rose, ‘Francis Meilland’ has won top honors this year. The best part: It was tested under NO SPRAY conditions and still won! Wow! Can’t wait to hear more about this beauty..
Saturday 8/25/2012 – 9:30 am CST or anytime thereafter on-demand just click HERE to listen.

Oh, there was a great article published in…
View original post 40 more words
By Linda Kay Harrison
You probably have a spot in your garden or landscape that needs a little ‘something’, right? Lots of people do, but are not sure what to do with it. Consider adding ornamental grasses.
Ornamental grasses are a wonderful addition to any garden. There is a size and shape to fit almost any space. Some grasses have a graceful arching habit, while others are very upright and vase shape. They provide an appealing texture and contrast to most garden plants. There are grasses for both sun and shade, and most varieties can also provide year-round interest.

Landscape project completed by Dennis’ 7 Dees at PDX Headquarters
Grasses also come in a wide variety of colors and textures. In addition to green, there are grasses that are tones of bronze, reds, yellows, golds, silvers, blues and even black. Some grasses have narrow, wispy blades, and some are bold, with wide leaves and fleshy stalks.

PDX Headquarters
Most ornamental grasses produce a plume or seed head that adds an element of interest beginning in late summer and that, if left uncut, will usually last through the winter. The best time to cut back most ornamental grasses is late winter or very early spring, just as the new growth starts popping up.
Here is a brief list of some of our favorite grasses:
Sun grasses:
Blue Oat Grass
Fescue ‘Elijah Blue’
Liriope
Molina ‘Variagata’
Miscanthus ‘Morning Light’
Calamagrostis ‘Karl Forster’
Pennisetum ‘Karley Rose’
Carex – ‘Prairie Fire’
Shade grasses:

Carex ‘Sparkler’ and ‘Evergold’
Japanese Forest Grass
Ophipogon ‘Black Mondo’
Juncus ‘Gold Strike’ and ‘Unicorn Rush’
Lazula ‘Aurea’
Evergreen grasses:

Blue Oat Grass
Fescue ‘Elijah Blue’
Liriope
Carex
Juncus

Grasses can add a contemporary look to containers especially when paired with annual succulents!
Dennis’ 7 Dees carries a wide variety of ornamental grasses and their knowledgeable staff can help you find just the right grass for that spot that needs that little ‘something’ special.

By Drew Snodgrass – Landscape Designer at Dennis’ 7 Dees & one of the original Dees Ready to tackle a most rewarding landscape improvement? Water features are a breathtaking addition to the landscape but please consider avoiding the pitfalls that create high maintenance and a less than attractive final result.

Designed by Drew Snodgrass of Dennis’ 7 Dees


Although this sounds like a fun DIY project it really is lots of work and the easiest way to do any or all I’ve suggested is call Dennis’ 7 Dees Landscaping, (503)777-7777, get a great design, free estimate and have us install a beautiful and low maintenance end result.

The photos included in this article are of some of my water feature installations. . Water features are one of my favorite elements to incorporate into the landscape.
Drew Snodgrass, CLP, Dennis’ 7 Dees Landscaping

